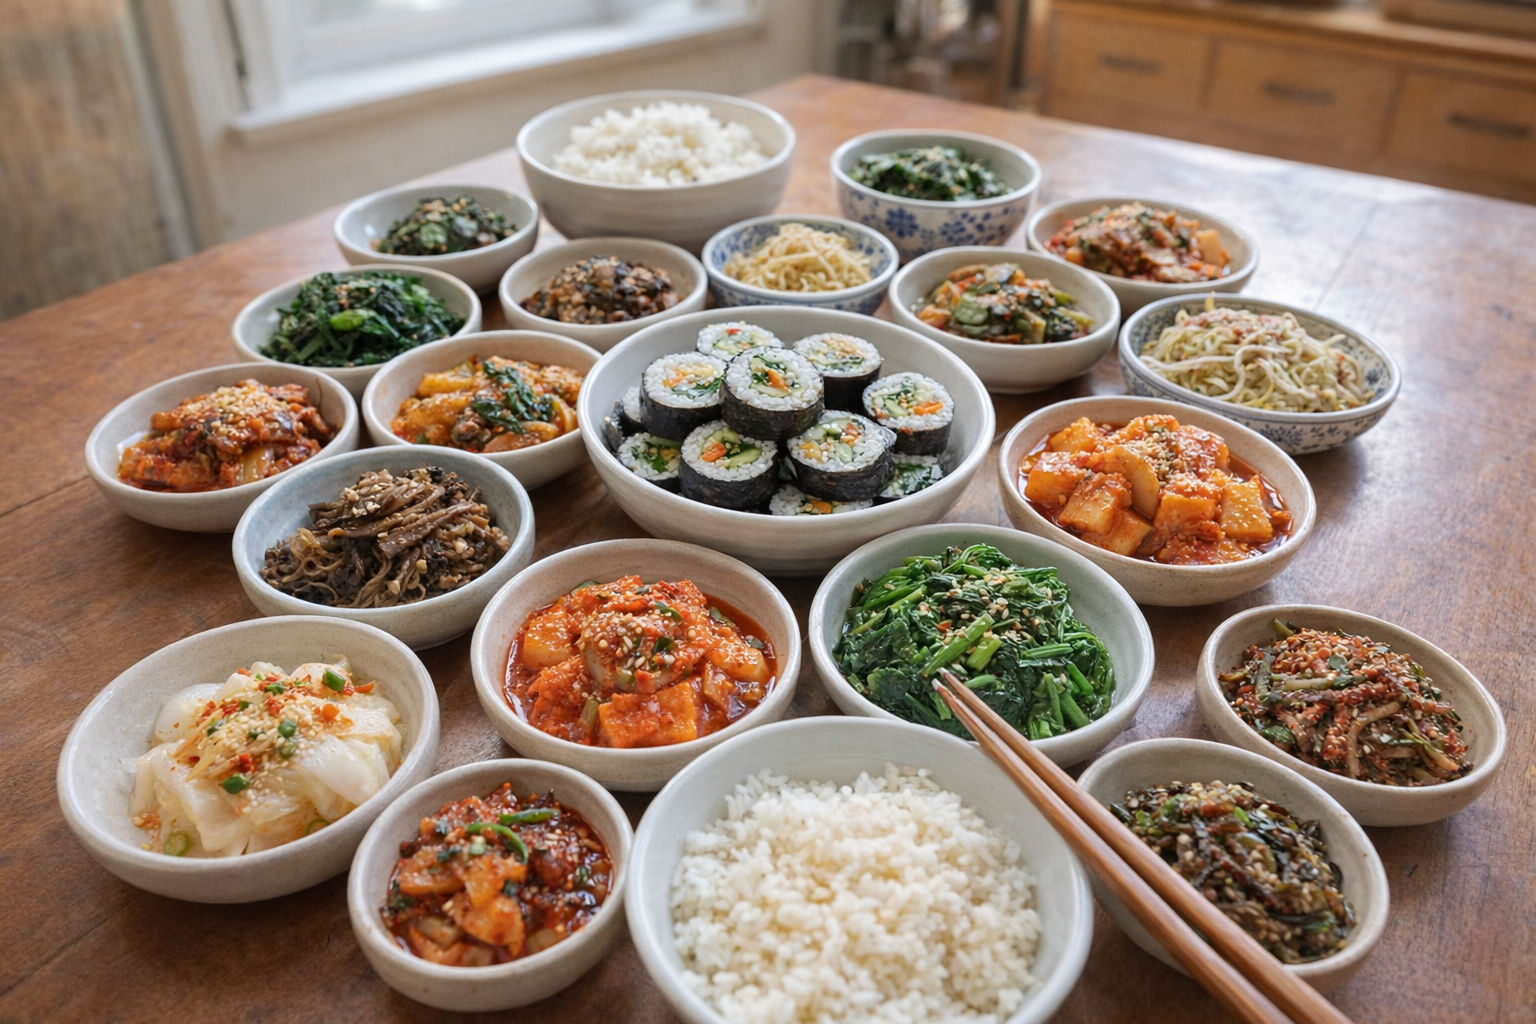
How to Make Delicious Korean Banchan at Home: A Culinary Guide to 20 Essential Side Dishes

Okay, here's the rewritten and expanded version of the Korean side dish article, designed to be a comprehensive and SEO-friendly culinary guide.
Introduction
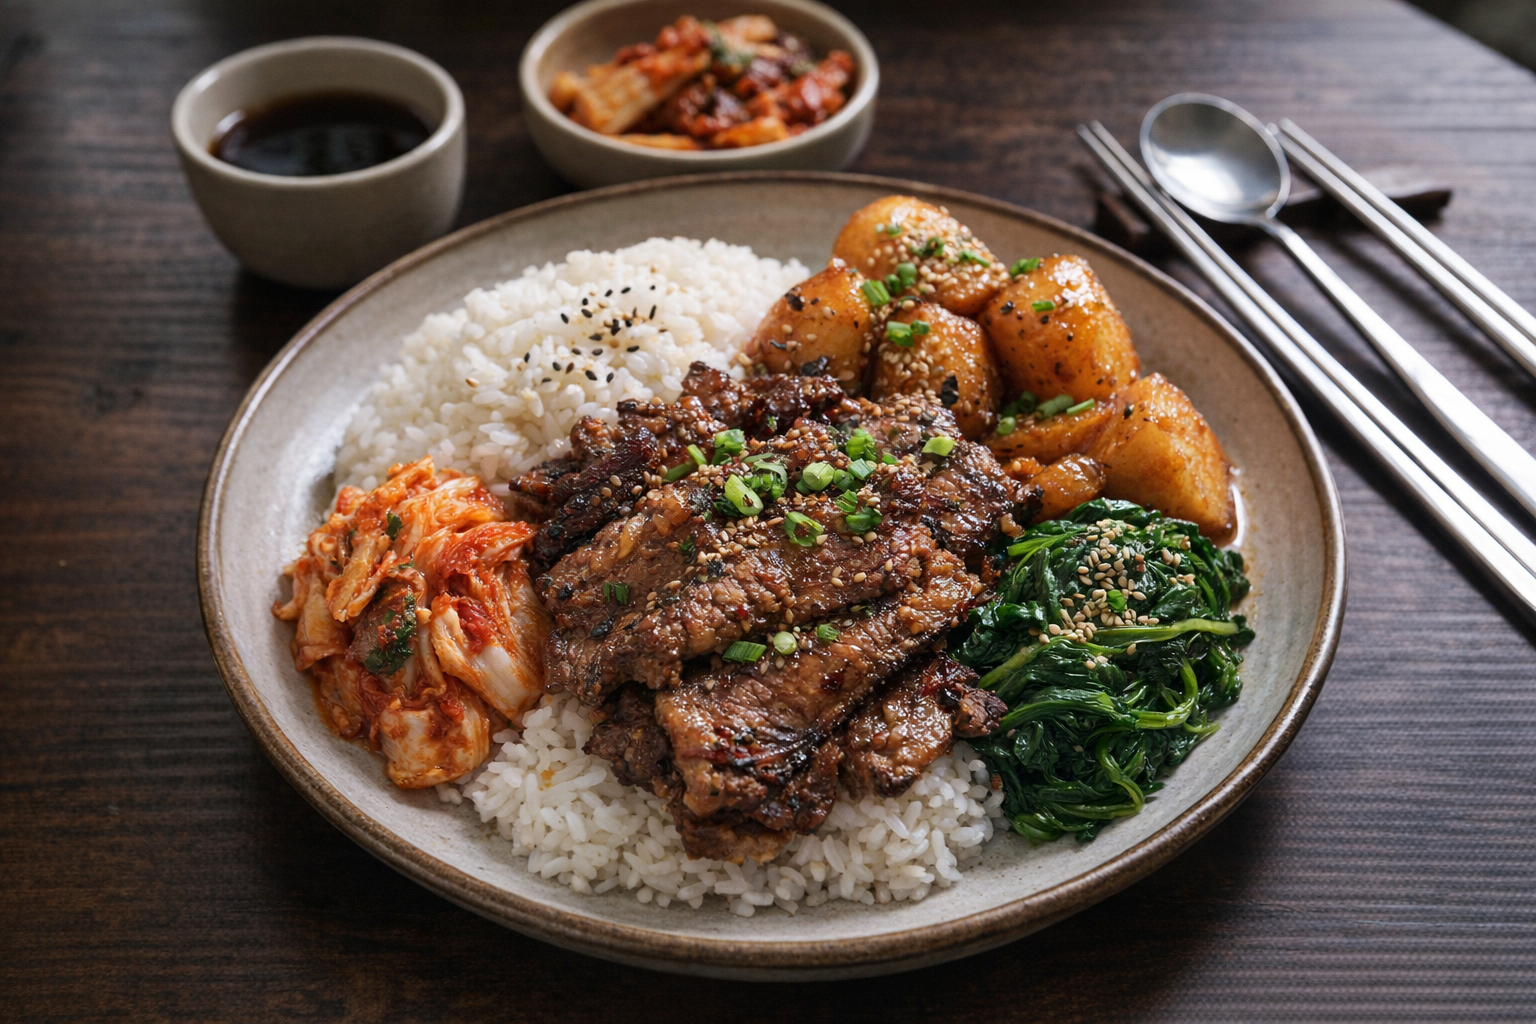
Korean banchan, those delightful side dishes that accompany every Korean meal, are much more than simple accompaniments; they are a testament to the country's culinary heritage and a vibrant expression of its flavors. From the fiery depths of kimchi to the refreshing crispness of seasoned cucumbers, banchan offer a spectrum of tastes and textures that elevate any dining experience. Mastering these dishes allows you to bring the authentic flavors of Korea into your own kitchen. In this guide, we'll explore 20 essential banchan, providing insights and tips to help you create them with confidence.
The beauty of banchan lies in their versatility and balance. They provide contrasting elements that complement the main course, stimulating the palate and enhancing the overall meal. The umami-rich flavors of fermented kimchi, the subtle sweetness of braised potatoes, and the refreshing coolness of cold noodles create a harmonious symphony of tastes that is uniquely Korean. These recipes will focus on techniques and ingredient selection to help you achieve truly authentic results.
Understanding Korean Side Dishes
Banchan encompass a vast range of dishes, each with its unique ingredients and preparation methods. While some, like kimchi, rely on fermentation for their complex flavors, others, such as seasoned vegetables, are quick and easy to prepare. The key to successful banchan lies in understanding the core ingredients and how they interact to create the desired flavor profile. Many recipes use staples like gochugaru (Korean chili powder), sesame oil, soy sauce, and garlic. Experiment with high-quality ingredients to notice a positive difference in the final outcome. When shopping, look for fresh vegetables, properly fermented kimchi, and good-quality Korean sauces and seasonings.
Why Cook Banchan This Way?
- Versatility: Banchan can be customized to suit any palate or dietary preference, with vegetarian, vegan, and gluten-free options readily available. You can easily adjust the spice level or swap out ingredients to create your own unique variations.
- Flavor: The complex and nuanced flavors of banchan are a defining characteristic of Korean cuisine. The use of fermentation, spices, and fresh ingredients creates a symphony of tastes that is both satisfying and addictive.
- Convenience: Many banchan can be made ahead of time and stored in the refrigerator for several days, making them perfect for meal prepping or busy weeknights. This allows you to enjoy a variety of flavors without spending hours in the kitchen.
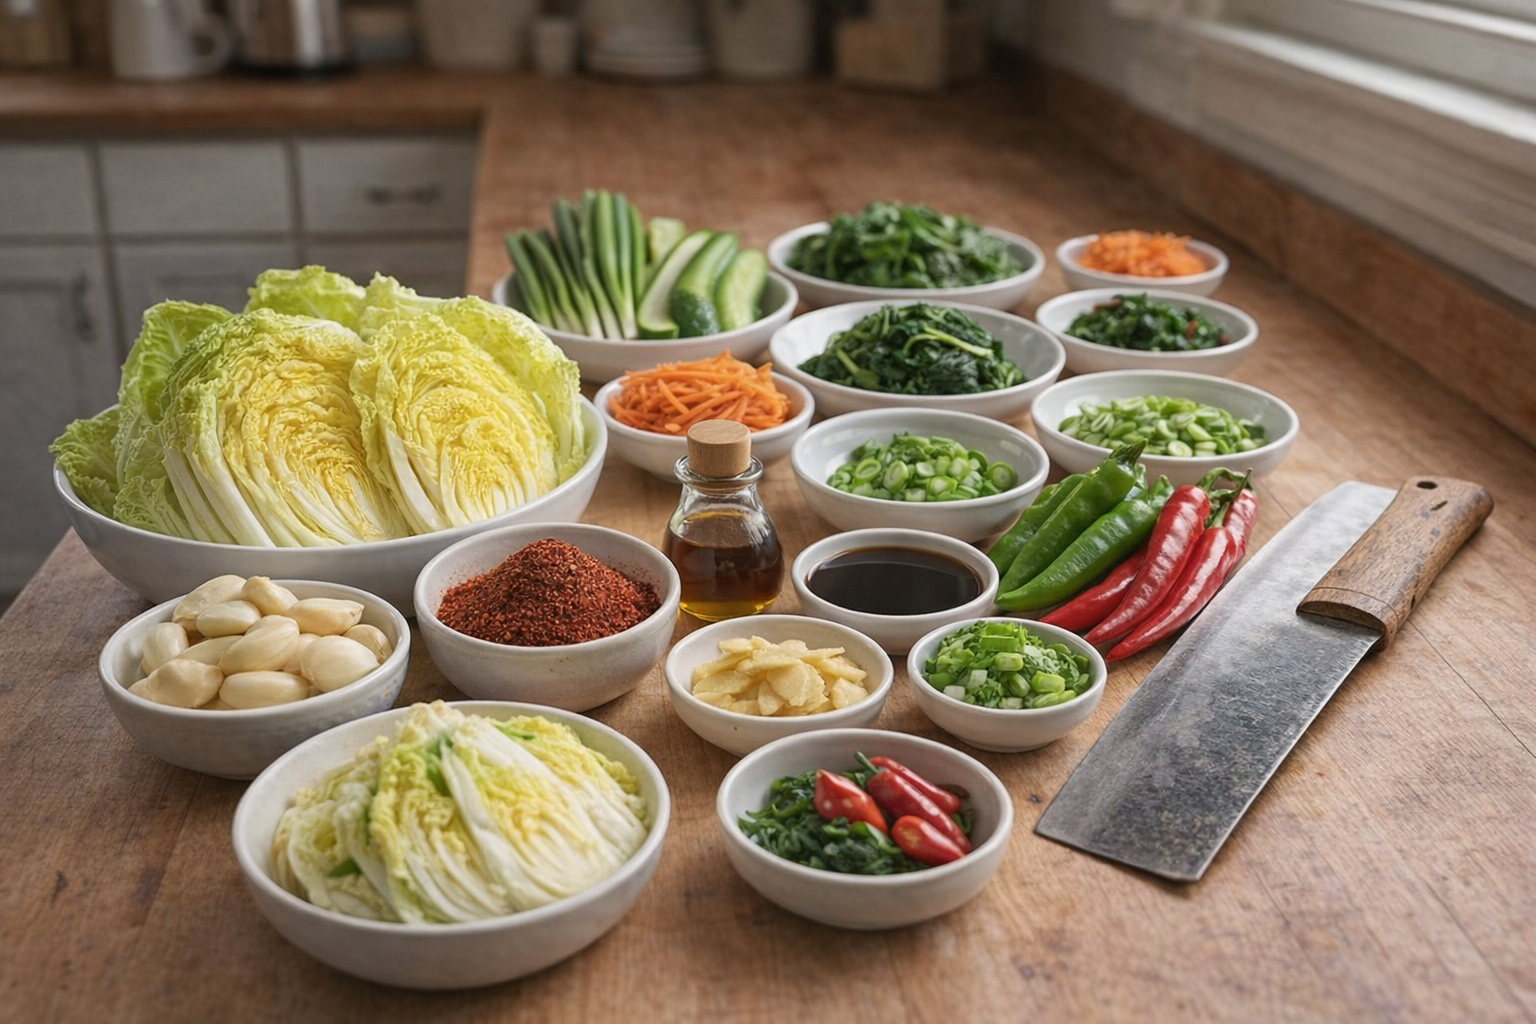
Preparation (Mise en Place)
Before diving into the recipes, it's essential to gather your ingredients and prepare them properly. This "mise en place" will ensure a smooth and efficient cooking process.
- Vegetables: Wash and chop all vegetables according to the recipe instructions. For dishes like kimchi, this may involve brining the cabbage to soften it.
- Seasonings: Measure out all seasonings, such as gochugaru, soy sauce, sesame oil, and garlic. This will prevent you from scrambling for ingredients mid-cooking.
- Proteins: If using meat or seafood, thaw it completely and cut it into the desired size and shape.
Essential Tools
- Korean Mortar and Pestle (optional): For grinding spices and creating authentic Korean flavor bases.
- Mixing Bowls: For combining ingredients and marinating proteins.
- Chef's Knife: A sharp chef's knife is essential for chopping vegetables and preparing ingredients. We recommend an 8-inch knife.
- Wok or Large Skillet: For stir-frying and sautéing ingredients. The slight curvature is helpful to keep all ingredients moving.
- Storage Containers: For storing leftovers and meal prepping.
The Cooking Methods
We'll explore a range of cooking methods commonly used in Korean banchan preparation, from fermentation to stir-frying to steaming.
Method 1: Baechu Kimchi (Cabbage Kimchi) - Fermentation Method
Kimchi is probably the most popular Korean side dish. We'll learn the steps to making authentic Kimchi.
Ingredients:
- 1 large Napa cabbage (about 2-3 pounds)
- 1/2 cup kosher salt
- 6 cups cold water, divided
- 1 cup Korean radish, peeled and julienned
- 4 scallions, trimmed and cut into 1-inch pieces
- 4 cloves garlic, minced
- 1-inch piece of ginger, minced
- 1/4 cup gochugaru (Korean chili powder)
- 2 tablespoons fish sauce (or soy sauce for vegetarian)
- 1 tablespoon sugar
- 1 tablespoon Korean salted shrimp (saeujeot), minced (optional)
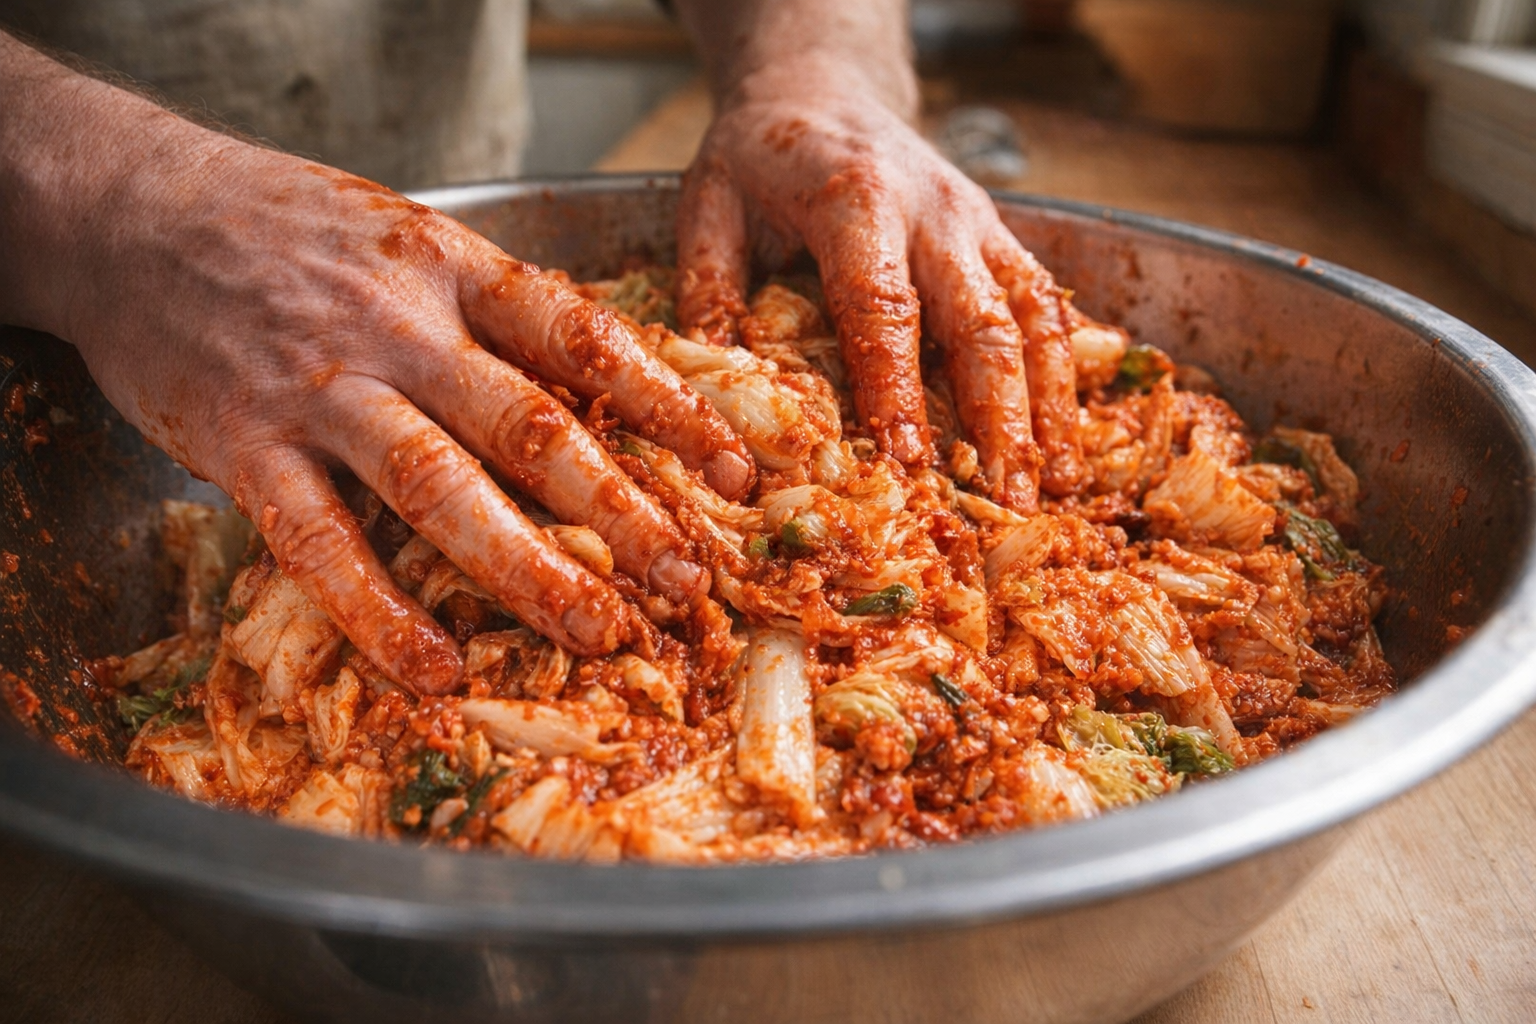
- Prepare the Cabbage: Cut the cabbage lengthwise into quarters. Remove the core and then roughly chop the cabbage leaves into 2-inch pieces.
- Salt the Cabbage: Place the chopped cabbage in a large bowl and sprinkle with salt. Add 3 cups of cold water and massage the salt into the cabbage. Let it sit for 1-2 hours, turning occasionally, until the cabbage is wilted and softened. You'll notice the volume decrease significantly.
- Rinse the Cabbage: Rinse the salted cabbage thoroughly under cold water to remove excess salt. Drain well and squeeze out any excess water. This ensures the kimchi isn't too salty.
- Prepare the Kimchi Paste: In a separate bowl, combine the Korean radish, scallions, garlic, ginger, gochugaru, fish sauce (or soy sauce), sugar, and salted shrimp (if using). Mix well to form a thick paste. The aroma should be pungent and spicy.
- Combine and Massage: Add the rinsed cabbage to the kimchi paste and use your hands to thoroughly massage the paste into the cabbage leaves. Make sure every piece of cabbage is coated with the mixture.
- Pack and Ferment: Pack the kimchi into a clean glass jar or container, pressing down firmly to remove any air pockets. Leave about 1-2 inches of space at the top of the jar.
- Ferment at Room Temperature: Let the kimchi ferment at room temperature (68-72°F or 20-22°C) for 1-5 days, depending on your preference. Check it daily. You will see bubbles forming, which is a sign of fermentation. Taste the kimchi after 1-2 days. When it reaches your desired level of sourness, transfer it to the refrigerator to slow down the fermentation process.
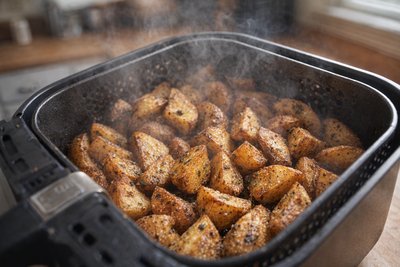
Method 2: Gamja Jorim (Korean Braised Potatoes) - Braising Method
Gamja Jorim is a sweet and savory braised potato dish. Let's dive into the steps!
Ingredients:
- 1 pound small red potatoes, scrubbed and halved or quartered (depending on size)
- 2 tablespoons vegetable oil
- 1/4 cup soy sauce
- 2 tablespoons sugar
- 1 tablespoon mirin (or rice wine)
- 1 tablespoon sesame oil
- 1 teaspoon minced garlic
- 1/2 teaspoon gochugaru (Korean chili powder), optional
- 1 tablespoon sesame seeds, for garnish
- Boil the Potatoes: Place the potatoes in a pot and cover with cold water. Bring to a boil and cook until tender but still firm, about 10-12 minutes. Drain well.
- Sauté the Potatoes: Heat the vegetable oil in a large skillet or wok over medium heat. Add the boiled potatoes and sauté until lightly browned on all sides, about 5-7 minutes.
- Add the Braising Sauce: In a small bowl, whisk together the soy sauce, sugar, mirin, sesame oil, garlic, and gochugaru (if using). Pour the sauce over the potatoes and bring to a simmer.
- Braise the Potatoes: Reduce the heat to low, cover the skillet, and simmer until the potatoes are tender and the sauce has thickened, about 15-20 minutes. Stir occasionally to prevent sticking. The aroma will become richer and more caramelized.
- Garnish and Serve: Remove from heat and garnish with sesame seeds. Serve warm or at room temperature.
Method 3: Oi Muchim (Seasoned Cucumber Slices) - Quick Seasoning
Oi Muchim is a refreshing seasoned cucumber side dish, perfect for hot weather.
Ingredients:
- 2 cucumbers, thinly sliced
- 1/2 teaspoon salt
- 1 tablespoon rice vinegar
- 1 teaspoon sugar
- 1 teaspoon gochugaru (Korean chili powder)
- 1 teaspoon sesame oil
- 1/2 teaspoon minced garlic
- 1/4 teaspoon sesame seeds
- Salt the Cucumbers: Place the cucumber slices in a bowl and sprinkle with salt. Toss to coat and let sit for 10 minutes to draw out excess moisture.
- Drain and Squeeze: Drain the cucumbers and gently squeeze out any excess water. This will prevent the salad from becoming watery.
- Add the Seasonings: In a bowl, combine the rice vinegar, sugar, gochugaru, sesame oil, and garlic.
- Combine and Toss: Add the cucumbers to the seasoning mixture and toss well to coat.
- Garnish and Serve: Garnish with sesame seeds and serve immediately or chill for later.
Cooking Time & Doneness Guide
- Kimchi: Fermentation time varies based on room temperature. Taste test daily, aiming for a sour, tangy flavor.
- Gamja Jorim: Potatoes should be tender and easily pierced with a fork. The sauce should be thick and glossy.
- Oi Muchim: Cucumbers should be crisp and coated evenly with the seasoning.
Visual Cues
- Kimchi: Bubbles forming during fermentation are a sign of activity. The color will deepen as it ferments.
- Gamja Jorim: The sauce will thicken and coat the potatoes, becoming glossy.
- Oi Muchim: The cucumbers will become slightly translucent as they absorb the seasonings.
Tips for Perfection
- Don't Overcrowd the Pan: When braising potatoes, avoid overcrowding the pan, as this will steam the potatoes instead of browning them.
- Use High-Quality Gochugaru: The quality of gochugaru can significantly impact the flavor of your kimchi and other dishes. Look for a vibrant red color and a slightly smoky aroma.
- Adjust the Spice Level: Feel free to adjust the amount of gochugaru to suit your personal preference.
Storage & Reheating
- Kimchi: Store in an airtight container in the refrigerator for several months. The flavor will continue to develop over time.
- Gamja Jorim: Store in an airtight container in the refrigerator for up to 4 days. Reheat gently in a skillet over medium heat.
- Oi Muchim: Best served fresh. Can be stored in an airtight container in the refrigerator for up to 2 days, but the cucumbers may lose some of their crispness.
Serving Suggestions
- As Part of a Korean Meal: Serve alongside rice, grilled meats, and other banchan for a complete and balanced Korean meal.
- As a Side Dish: Serve as a side dish with any meal to add a touch of Korean flavor.
- In Bibimbap: Add banchan to bibimbap (mixed rice with meat and vegetables) for extra flavor and texture.
- As a Snack: Enjoy as a quick and healthy snack.
💡 Pro Tips
- Use high-quality gochugaru (Korean chili powder) for the best flavor and color in your kimchi.
- When fermenting kimchi, burp the jar daily to release excess gases and prevent it from exploding.
- For Gamja Jorim, use small red potatoes as they hold their shape well during braising.
- Don't overcrowd the pan when stir-frying banchan ingredients to ensure they cook evenly.
- Taste and adjust the seasonings in each dish to suit your personal preferences.
Frequently Asked Questions
Yes, you can. For a vegetarian/vegan version, substitute the fish sauce with soy sauce (or tamari for gluten-free) and omit the salted shrimp. You can also add a tablespoon of kelp powder (dashima garu) for added umami flavor.
The fermentation time depends on your preference and the room temperature. Generally, 1-5 days at 68-72°F (20-22°C) is recommended. Taste it daily after 1-2 days. The longer it ferments, the sourer it will become. Transfer it to the refrigerator once it reaches your desired level of sourness to slow down the process.
If your kimchi is too salty, it's likely that you didn't rinse the cabbage thoroughly enough after salting. You can try adding a few slices of Korean radish to the kimchi, as they will absorb some of the saltiness. Alternatively, you can use it in cooked dishes like kimchi jjigae (kimchi stew) where the saltiness will be diluted.
Most banchan can be stored in the refrigerator for 3-7 days, depending on the ingredients. Kimchi, due to its fermentation, can last for several weeks or even months, although its flavor will continue to evolve. Ensure you store them in airtight containers to maintain their freshness.